/*Código do Google Analytics*/

Saturday, August 28, 2010

Creator Tip: Tricking Miss Complexity

Many creators out there are always angry that Miss Complexity won't allow for decent vehicles or spaceships. The spaceship editor already allows more, but that still isn't enough. Despite that, since patch 5 there is a trick: asymmetry.

Once you have your core game all patched up, all you have to do to is hold down "a" and select a base part. This will remove the base part's double as well as all those from the detail parts attached to it.

Warning: This will make all new parts attached to it asymmetric.

When you start hitting it high on the complexity meter, just do that and you should get it down a few notches, ready to add more to your vehicle or spaceship.

If you still need to add a symmetric part, you can still use a flat, square block and move that into the already asymmetric base part, but don't forget to hold down "a" first to get even more out of Miss Complexity.

Friday, August 27, 2010

How to draw in Spore: Moogle

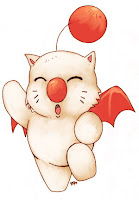
So for this tutorial, I’ve selected a simple line art – a moogle from Final Fantasy. I know it’s cute, but you creepy creators don’t have to share it :P It may look daunting at first, but hopefully I can help you out with that. The easiest way to figure out how to make it, in my opinion, is to look at in the editor and take it apart. But here’s a hopefully detailed and easy to follow tutorial. To the right is the moogle we will be making. This is also posted in my All About Buildings thread too.

Step One:

The first thing you should do is place a block, or whatever you’re making your picture on (I’m going to refer to it as the backdrop), in the center. Turn it to face the screen, raise it up using Ctrl, and make it as big as you see fit. You should probably make it as big as you can so you don’t have to squish everything together or fix it later. The next thing is to make your border. I usually just do a simple rectangle-ish one with a little color. You can go as extravagant or as simple as you want, but you have to take complexity in mind. I make the border first so I don’t have to worry about adding one later.
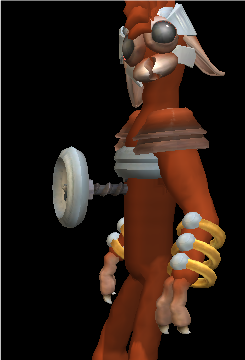
Step Two:


Now we will start making the image. When I make line art, it is almost entirely made of the Epee part. Since the moogle’s pom pom thing is at the top, start with that. Grab a Candominium base part, turn it with a connector (you won’t need to if you have DVDMaster’s mod), and put it near the top and a little to the right of the center. Make the rim black and the inside red. Then take an Epee, turn it so it’s smooth against the backdrop and sink it into the Candominium. Next take another 
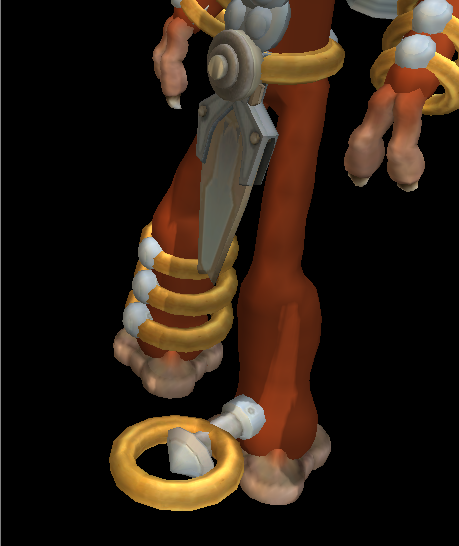
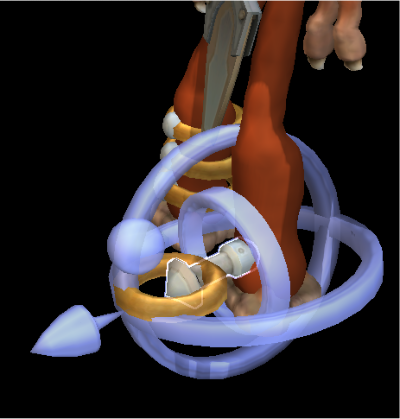
Epee, make it bigger with the mouse wheel and extend it a bit. As you can see in the diagram, I circled it in red, the base part of the Epee is outlined in white. You’ll have to turn it a bit using the axis, and sink it into the backdrop using Shift. I turned the screen a bit so you can get a view. This is how I actually make the pictures, they stick out a bit :( The first image is looking at it from the front making sure that the placement is right. The second is from the side.


Step Three:


Now do the outline of the face. At first it might look not so great, so don’t get discouraged. Trust me all of mine look horrible until I’m almost done. When looking at reference pictures, look at the lines and different angles. Don’t look at the image as a whole. Every line or curve makes up one Epee, sometimes if the line is pretty long it will take two. Here’s how many Epees you need and how to make them (sorry that they aren’t exactly straight, but you get the idea I hope):

The rest of the outline is composed of the Epee part. I used two Pointed triangle detail parts – a black and a red – for each ear. Try to just get theoutline of the head done, and then readjust after. As you can see from the first image, this should take up about half of the backdrop now.

There's also a video of what I have so far found here.

Step Four:


Now fill in the face. The eyes are two Epees, one on top of each
other. The nose is an Esphereal as well as the mouth. The whiskers and chin are Epees. For the nose, make the red part as big as it can get using the arrows. I had to use four black Esphereal for the outline to fit around the big red one. To make the chin, make the Epee as small as it can get and sink it into the backdrop. For the tongue, I made it a little smaller then the black Esphereal for the mouth, turned it a bit and painted it pinkish.

Step Five:

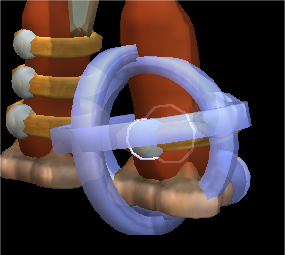
On to the body! This is entirely made of Epees. Make the body first starting with the right arm. The wings come last. I hope you guys can see all of the numbers and figure out the order. I started with the right arm, then went to the right leg, next was the left leg, then the gut, the left arm, and lastly the wings. It looks like there should be 30 Epees for the body and wings. I included a side image too, to show you what it looks like at this point.


Step Six:


Finally fill in the wings, add color, and smooth everything out. For the right wing I used two Boxy, one Pointed, and two Tear Dropped parts. Make sure that all of these parts kind of flow together as best as you can. You’ll have to sink them into the backdrop using Shift. Refer to the image for where to place these parts. The Tear Dropped parts go in the tips of the wings (numbers 1 and 2). The Boxy parts go in the top angle of the wing and by the arm and shoulder (numbers 3 and 4). The Pointed part goes in the second corner thingy where the wing and fur meet (number 5). The left wing is made of two Hanging Fangs.

I added a pink Esphereal to the nose and another to the pom pom. I also added cheeks made of Dollop Habitat base parts. You don’t have to add cheeks, but if you do you have to adjust the whiskers. Lastly I made the backdrop a light brown. Make it whatever you want or just leave it white. There’s a little complexity left, so add more details if you want or make a more extravagant border.


And now for the final image!


I hope this made sense. Just ask if you want anything cleared up or you want any additional information :D!

Thursday, August 19, 2010

CreatorTip: Color

I have gotten many questions on some of my creations asking me how I do this. So, I decided to make a short guide on how to manipulate color and limbs to make the body seem like it's two different colors. There is one color scheme in particular that allows you to do this. It is found in the detail section, first page, 4th on down on the far left. (See in the screencap to the left)


This color choice only covers the knees or elbows of the limb, this allows you to push limbs together to make it seem like a solid color and a part of the body. The best limb to use is the slackwrist arm, as this makes it flow more smoothly with the normal body, however it works with any limb. The screenshot below shows how you have to push the limbs together to get this effect.


Shape the limbs anyway you want to, however make sure they are sized correctly so they flow together. The result should look somewhat like this:


Part of the body is the base color, but the other part is the detail color shaped to look like it's part of the body color.

Check Out: CopperLou

Greetings my fellow Sporeans. Like Rebecca1208, Sakiara, Andeavor and techno605, I was invited by Parkaboy to assist in adding entries to his fantastic blog. Compared to the other authors here, I'm somewhat new to Spore. I've been creating since September 2009 and have yet to stop loving Spore. I look forward to making entries in this blog and hopefully assisting others with the tips I have to offer.

I specialize primarily in creatures, however I also use the building editor a lot and occasionally the vehicle and space ship editors. I try to make all types of creatures such as fantasy, mythological, mechanical, artistic, realistic, and horror.

On the Sporum, I'm primarily known as SporeMasterCopper one of the moderators of the forum. So if you ever have a problem with the game or sporum(or just a question,) feel free to shoot me a PM and I'll help you out best I can. Once again, I look forward to helping out with this blog, I know I have a lot of tips I can't wait to share with the community!

Sunday, August 8, 2010

CreatorTip: Rotating Roofs and Bases

I've been asked many, many times how I manage to rotate roof and base parts since all we can do is swivel them around. There are two easy ways to do that:

Using Connectors


Place a roof or base part on any connector attached to another basic part. Then rotate the connector until you've reached the desired angle. Now you have two choices, you can either drag the base/roof far enough away with the shift or alt key and delete the connector or simply copy the base/roof and a copy will be left in place. You can then move the connector again and place another tilted roof/base to create more advanced creations
. This technique allows for creating circles, arches and spirals using nothing but base blocks.

Note: Doors are considered detail parts and will automatically reset their position when you accidentally hover the mouse over an arrow of the base part.


Using the Rotation Mod


DVDMaster was kind enough to make a Building Editor Mod adding an additional rotation ring to the base and roof parts when you hit the tab key. You can install it like other mods by placing the .package file into the Data folder of your Spore installation directory.

Note: Currently, the mod only works on the PC.

Friday, August 6, 2010

Sporing for Dummies

by Andeavor


Chapter 1 - Becoming a good Creator

Each editor has its own secrets, which are ready for you to explore. Many of the successful creators have been with Spore since the beginning two years ago and naturally have progressed so far to know their favorite editor inside out.


If you like a particular creation, don't hesitate to take it apart in the editor to see how it was done. In the beginning it can be hard to even retrace the steps but with enough trial and errors you'll eventually get the hang of it.


If possible, get the most out of your creations by reaching the complexity meter limit, carefully choose the textures and colors and don't be afraid to take your time. The more you spend in the editor the better you'll get.


Chapter 2 - Getting on the MPN


Being on the MPN is a great feeling, especially if you're new to the game or haven't been in the spotlight before, but remember that nobody will notice your work unless you make them aware of it.


Several times a week, go on the MPN and comment on (and uprate) anything you like. Don't ask to have your creations looked at, just leave a nice comment or a creative suggestion. Other players will enjoy that more than needy-sounding comments.


Chapter 3 - Increasing Subscribers


The same rules apply to the subscriptions as to being on the MPN, but additionally you can ensure someone coming to your page and buddying you for a few reasons.


You could either specialize in themed sets, specific artwork or make highly detailed props that other players could use or be exited about seeing in their game. With enough practice you should get together a nice portfolio that could attract a couple subscribers every week.


Chapter 4 - Treating other Creators


Spore is a game with an in-game networking system. Since Maxis and EA can't or won't censor your speech in comments you should watch your potty mouth. Too much foul language can get you reported enough to being banned.


If you want to be treated nicely you should do so, too, since what you give is what you get. And who


Chapter 5 - Dealing with Downraters


If another creator maliciously puts down your work and constantly harasses you, immediately report their nasty comments and then block them from commenting. It is best to ignore downraters as all they're looking for is a reaction. This also means actively going against one or more downraters.


If you keep giving them the attention they will have won long before your newest creation has a red face.


Addendum


Have patience and keep creating, Rome wasn't built in a day either. :D

Check Out: Andeavor


Good morning sunshine, the earth says hello!
I've been invited to co-author this blog a long, long time ago in a galaxy far, far a- wait, I digress.

I've been with Spore since the beginning and have garnered quite some experience. When I started in Spore two years ago, I was appalled at the lack of proper building sets. I started to make my own complete set and the rest is history.


I have specialized in the building editor and I'm famous for my realistic buildings and large collection of themed sets. Before GA came out I also started making props and later have started making the one or other adventure template.


I've been involved in several organizations within the Spore community, from the now defunct TCP and Spore TV to the Euroclub and for a short time I was also behind Spore Uni which has closed its gates for a while now.


Anyway, check out my profile!

Saturday, July 31, 2010

Check Out: techno605


Hi everybody! Just like Rebecca1208, Sakiara and Andeavor i was one of the lucky ones that Parkaboy asked to join his Blog as an author. So i'd like to take this opportunity to introduce myself for those that don't know me i've been creating since Jun 21, 2008 and i've become well known for my Artwork with the Building Editor. I've been told my artwork has inspired many creators and i'm always willing to share my knowledge and answer any questions concerning the Building Editor.

I've also held a couple of Building Editor Art Contests in the Sporums that inspired a large number of creators to try out their art skills with some amazing results that can be viewed in my Techno605's Art Gallery
Sporecast alongside with many other top quality Artwork that i have selected from the Sporepedia.
So feel free to ask me any questions concerning the Building Editor and i'll be posting some tutorials here soon.

Wednesday, July 28, 2010

Check Out: Sakiara


Hello Sporeans! I've been invited by Parkaboy and will be an author here. I'm a veteran in Spore and have been creating since the Creature Creator. So I hope I can help out with some tips and tutorials.

I for the most part specialize in buildings. Lately I've been making silhouettes and line art. I've made some actual buildings including a few sets, and art buildings as well. I also have some props, a couple of adventures, and a few creatures as well. I typically create cute and beautiful creations that are filled with detail and color.

I've also been involved with TCP, Spore TV and I've held a few contests. I'm all about the community and helping people out. If you need any advice, tips, critiques or whatever. Be sure to let me know! You can also find anything building related in my All About Buildings thread on the Sporum. Oh ya, here's my profile if you want to check it out, talk, or have any questions: Sakiara.

Friday, July 23, 2010

Check Out: Rebecca1208


Hey guys! As you may have heard, Parkaboy has invited a few more creators to help out here and post their own content. As well as checking out Parkaboy's tips, I hope to provide help and advice on creations as well, specifically creatures and adventures, and maybe make a few reccomendations and spotlights on some fantastic creators, too.

I also have a collection of tutorial videos on YouTube, under DarkEdgeTV, which shows play-throughs on how I create creatures, different commands in each editor, and how to make certain environments or play with props in Galactic Adventures.

Now, to start with, a little self-promotion, to help introduce myself. For those who don't know me, I'm mainly known for creating Dragons and other fantasy creatures in a variety of designs and styles. I try to vary in creating and step away from Dragons by creating spaceships, horror-designs, sci-fi characters and realistic or prehistoric animals. Some of my more well known creations includes "Eden", my "Aquatic Stage" adventure, and my "Valley of the Dragons" adventure series.

While I mainly create for art, recently I've been more concious of how the creations act in other peoples' games, so I'm beginning to be a lot more careful in my designs by testing animation far more often. I try to give all of my creations a sense of realism to begin with, since I'm very fussy over anatomy and proportions. So hopefully, I'll start creating content with a far better performance than last time.

I'm also helping out in a couple projects or clans/fanclubs with a variety of creators, including Vektrix's EuroSpore forum, Piratenori's Civilised Sporeons forum and Hilight's SNS (serious noise shipyards) in the Sporum. I've also taken part in other groups, such as the Knurldown Clan, The Golden Spotlight and the Darkened Abyss Clan.

So feel free to find me in the Sporum, or drop by at my Spore page, Rebecca1208 to see more creations (:

Wednesday, July 21, 2010

SporeTips Announcement

Hey, folks! I know the blog has been pretty slow for some time now... The last couple of years I've had a job taking most of my time, so I've finally decided to invite a few talented and experienced creators to come on board. On the next few weeks you'll start to see new faces (or rather new screen names) popping in. Stay tuned for new posts and check out the "Authors" sections on the sidebar for updates!

Cheers!
Parkaboy

"Darkspore" Announced!

You guys know I usually don't do news, but it's exciting to finally have something new to talk about in the Spore community: Darkspore!

We've known very little about Darkspore on the last few weeks: a couple of trademarks filed by EA, a few concept art pics leaked from the website hile in construction... We didn't even know if it was going to be a standalone game or an expansion...

Now we know! Yesterday the Darkspore official website came online with details and a teaser trailer, which you see below.

This was timed with July 20's EA Studio Showcase, where they revealed a few new titles. The Showcase, transmitted live via web, had a little gameplay footage for Darkspore, which you can also see in the video:


So there we go! Schedule for release in February 2011, Darkspore is going to be a multiplayer action RPG for the PC, with a creature editor similar to that of Spore. Don't forget to check the "Living Weapons" page on the official website for a sneak peek of the new creature parts!

Also, as MaxisCactus (the Spore Community manager) have stated on the Sporum, while we won't be able to export Spore creatures to Darkspore, we'll have the opportunity to create NPC enemies for the new game, possibly through the Template Contests that have been going on already on the Community Showcase section.

Sunday, May 30, 2010

Adventure Class - Lesson 1

Since my adventures have been rather successful during the last few months, many people have been asking me for tips on adventure-making. Because of that, I decided to start a feature on SporeTips very much like the Building Class I started some time ago.

But first I must warn you that this is not a simple tutorial. I'm not going to teach you the controls, the shortcuts, or anything like that. I'm assuming you are already familiar with the Adventure Editor, and only needs tips to increase the quality and, consequently, the popularity of your adventures.

Also, I warn you that these tips aren't a sure formula for success. The results will always depend on how well you apply the tips. Also, whenever I tell you to avoid doing something, you should not take that advice as a rule: you can probably do the opposite of I tell you to and still make a good adventure. The tips are supposed to be guidelines, not commandments written in stone.

So shall we start?


LESSON 1: On making your adventure attractive for players

Okay, let's begin with a topic that's almost entirely ignored by newbie creators, causing their adventures to go unnoticed for a long time: the preview images.

A preview image is like the cover of a book. You know the saying "don't judge a book by its cover"? Well, a lot of people do judge the adventures from the preview pics. You have to understand that for most people it takes a couple of minutes to download the assets and load a mission, and they don't want to waste that time unless they have a reason to believe the adventure is going to be cool.


Which one would you rather play?

So you need at least four preview pictures to capture the player's interest. The first pic is the most important of all, since that's going to be the thumbnail of your adventure. A good thumbnail is the difference between getting on the Most Popular New shortlist and barely getting any plays. To take a screenshot you only need to click the "C" button once on your keyboard, and then sort out the four preview images you want for your adventure on the central panel where you also choose the name, genre, description and tags for your adventures.

Here are a few tips for getting good preview pictures:

  1. Don't leave the "default" planet picture on any of the preview slots, specially the first one. Unless you're making a planet template, that's pretty much the worse mistake you can make.
  2. Don't take your screenshots from the editor! You can enter the Test Drive Mode and take the shots from there. That way you won't end up with the handlers and team identifyers (those green, or red squares under each creature) showing up in the image. Those are visual aids for the editor, they're not part of your adventure!
  3. I know the Test Drive Mode has an important limitation on camera angles. But you can use the "freecam" cheat to allow you the freedom of choosing any camer angle you like. That's important, because you don't want the default captain creature to show up on the picture! Unless you're making a locked-captain adventure, the captain you choose on the editor is just a placeholder, and won't even show up in the adventure! So why should it be front and center on the preview?
  4. You can put together a scene specially for taking a picture. Remember you can delete the creations after taking a screenshot, so you're not constrained to taking pictures of events and places that actually happen or appear in the adventure. Try to create a scene that's descriptive of the whole adventure experience: put main characters in there, even if they don't appear together in the adventure; use effects to make the scene cooler and use gates to carefully place vehicles and creatures wherever you wish (check the How to disguise gameplay objects as creatures post if you need).
  5. Try to learn how the rectangle screenshot translates into a square preview pictures. You have to understand that the sides of the image will be cut off in the preview, and compensate for that. Take many screenshots from slightly different angles and positions, and choose the ones that look best. That way you'll learn by practising how to choose the best angles and layouts.
While getting good preview images is important, there are other tips that will help your adventure get more attention from players. Here are some of them:
  1. Don't make locked-captain adventures. Unless you have a very good idea for a new game dynamic and you need control over the player stats, you have no reason to force the player to use a specific avatar. If the player can use his own captain, then he'll be awarded experience points for playing your adventure. That's an extra reason to get his/hers interest.
  2. Get your adventure to be worth more points! Sure, you can't control the value of your mission in experience points, but there are a few ways to make it a little bit higher. The main ones are: make your adventure harder (try to make the player die a couple of times before completing it); and make your adventure longer than a couple of minutes.
  3. Choose an interesting title. Good titles often sound cool, or have a good alliteration. Or they may be a reference to a famous work, a movie, a book, a play, a game, or even just a quote. And remember to capitalize your titles!
  4. Give the player a good idea what's the adventure about in the description, without spoiling the ending, of course! Look at the Maxis adventures for a model on good uncomplicated descriptions. Try to avoid breaking the fourth wall by adding "I made this adventure because I watched movie such-and-such" or "technical" info such as the adventure version. Leave those kind of comments to brackets, such as this: [adventure made from John Doe's template].
  5. Add good tags. Tags are important, but not essential. You can get a few extra plays if you're careful about choosing proper tags. Add stuff that the adventure has that may be of interest to players, such as: mystery, murder, explosion, love story, robots, zombies, etc.
That's all for now, folks! I'll be back soon with more tips! Stay tuned!

Monday, January 25, 2010

CreatorTip: Advanced outfitting technique

I have always been unhappy with how some of the outfitted creatures turned out: most of the time, your alien species' suit or armor ends up looking as if each part was glued on the being's sking. Of course, that's how the editors work: you attach stuff to a creature's skin.

But I'm going to share today a technique I have developed to help create outfits that are a lot more convincing. There are a few limitations to this technique, and it takes a lot of practice to create suits that animate properly, but here it goes...

This is what we're aiming for. This technique allows you total control over where you place an outfit part, and it's used mainly to let you place rings around a creature's limb or body.


This is how you should start: add a Snokelicious part and place a Ring part carefully on top of the Snokelicious. You can only place one part on top of another if you have installed Galactic Adventures or one of the latest patches. In earlier versions of the game the outfit parts can't be stacked.

Hold the "Tab" key while selecting a part to access more handlers and position the parts as shown below:


Now here comes the tricky part: select the snokelicious, NOT the ring, and hold "Tab" for the advanced handlers. As shown below:


You can then rotate the snokelicious - NOT the ring - 180°, so it now points to the inside of the creature's limb or body. You may have to resize and move both parts to get the proper placement.


This technique can be used with any parts, though you will find out that not every part stacks on everything. Parts such as hats can be only placed on top of certain types of parts, such as shoulderpads or chest parts. With training you'll learn how to get the best combinations of parts.

Another combo that looks pretty good is the Bolt/Tinker Ticker. I use that a lot, and it helps create some very cool spacesuits. You should start with the placement of parts shown below, and follow the same steps as shown above.


Practice this technique and soon you'll be making outfits like this one:


Update: Rebecca1208 has created a video tutorial based on this technique. It might be easier to learn from it, so here it is!


Thursday, January 7, 2010

Attack of the Spores!


I just finished my biggest adventure so far!

In "Attack of the Spores!" your captain must help the human crew of the Starship Leviathan get rid of the threat of face-hugging, mind-controler alien spores - and without killing the human hosts! Get ready to explore the entire interior of this big vessel - there's even a hangar and escape pods!

Seriously, folks... this took me nearly 20 hours of work to build. I hope you guys enjoy it! I tried to make sure that there would be no bugs, and I hope you can appreciate the extra effort. If you play it, make sure to rate it up!

Click the image on the top for the link, or check more screenshots below: