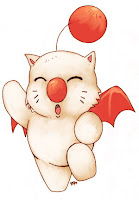
 So for this tutorial, I’ve selected a simple line art – a moogle from Final Fantasy. I know it’s cute, but you creepy creators don’t have to share it :P It may look daunting at first, but hopefully I can help you out with that. The easiest way to figure out how to make it, in my opinion, is to look at in the editor and take it apart. But here’s a hopefully detailed and easy to follow tutorial. To the right is the moogle we will be making. This is also posted in my All About Buildings thread too.
Step One:
The first thin
 g you should do is place a block, or whatever you’re making your picture on (I’m going to refer to it as the backdrop), in the center. Turn it to face the screen, raise it up using Ctrl, and make it as big as you see fit. You should probably make it as big as you can so you don’t have to squish everything together or fix it later. The next thing is to make your border. I usually just do a simple rectangle-ish one with a little color. You can go as extravagant or as simple as you want, but you have to take complexity in mind. I make the border first so I don’t have to worry about adding one later.
Step Two:
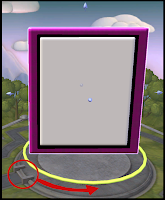
Now we will start making the image. When I make line art, it is almost entirely made of the Epee part. Since the moogle’s pom pom thing is at the top, start with that. Grab a Candominium base part, turn it with a connector (you won’t need to if you have DVDMaster’s mod), and put it near the top and a little to the right of the center. Make the rim black and the inside red. Then take an Epee, turn it so it’s smooth against the backdrop and sink it into the Candominium. Next take another Epee, make it bigger with the mouse wheel and extend it a bit. As you can see in the diagram, I circled it in red, the base part of the Epee is outlined in white. You’ll have to turn it a bit using the axis, and sink it into the backdrop using Shift. I turned the screen a bit so you can get a view. This is how I actually make the pictures, they stick out a bit :( The first image is looking at it from the front making sure that the placement is right. The second is from the side.
Step Three:

Now do the ou
 tline of the face. At first it might look not so great, so don’t get discouraged. Trust me all of mine look horrible until I’m almost done. When looking at reference pictures, look at the lines and different angles. Don’t look at the image as a whole. Every line or curve makes up one Epee, sometimes if the line is pretty long it will take two. Here’s how many Epees you need and how to make them (sorry that they aren’t exactly straight, but you get the idea I hope):
The rest of the outline is composed of the Epee part. I used two Pointed triangle detail parts – a black and a red – for each ear. Try to just get theoutline of the head done, and then readjust after. As you can see from the first image, this should take up about half of the backdrop now.
There's also a video of what I have so far found here.
Step Four:
Now fill in the face. The eyes are two Epees, one on top of each
other. The nose
 is an Esphereal as well as the mouth. The whiskers and chin are Epees. For the nose, make the red part as big as it can get using the arrows. I had to use four black Esphereal for the outline to fit around the big red one. To make the chin, make the Epee as small as it can get and sink it into the backdrop. For the tongue, I made it a little smaller then the black Esphereal for the mouth, turned it a bit and painted it pinkish.
Step Five:
 On to the body! This is entirely made of Epees. Make the body first starting with the right arm. The wings come last. I hope you guys can see all
  of the numbers and figure out the order. I started with the right arm, then went to the right leg, next was the left leg, then the gut, the left arm, and lastly the wings. It looks like there should be 30 Epees for the body and wings. I included a side image too, to show you what it looks like at this point.
Step Six:
 Finally fill in the wings, add color, and smooth everything out. For the right wing I used two Boxy, one Pointed, and two Tear Dropped parts. Make sure that all of these parts kind of flow together as best as you can. You’ll have to sink them into the backdrop using Shift. Refer to the image for where to place these parts. The Tear Dropped parts go in the tips of the wings (numbers 1 and 2). The Boxy parts go in the top angle of the wing and by the arm and shoulder (numbers 3 and 4). The Pointed part goes in the second corner thingy where the wing and fur meet (number 5). The left wing is made of two Hanging Fangs.
I added a pink Esphereal to the nose and another to the pom pom. I also added cheeks made of Dollop Habitat base parts. You don’t have to add cheeks, but if you do you have to adjust the whiskers. Lastly I made the backdrop a light brown. Make it whatever you want or just leave it white. There’s a little complexity left, so add more details if you want or make a more extravagant border.
And now for the final image!

I hope this made sense. Just ask if you want anything cleared up or you want any additional information :D!


1 comment:
After seeing that I admire your work even more.
But that is complicated but with practice everyone can do it.
Great tutorial.
Thanks Sakiara =D
Post a Comment