But first I must warn you that this is not a simple tutorial. I'm not going to teach you the controls, the shortcuts, or anything like that. I'm assuming you are already familiar with the Adventure Editor, and only needs tips to increase the quality and, consequently, the popularity of your adventures.
Also, I warn you that these tips aren't a sure formula for success. The results will always depend on how well you apply the tips. Also, whenever I tell you to avoid doing something, you should not take that advice as a rule: you can probably do the opposite of I tell you to and still make a good adventure. The tips are supposed to be guidelines, not commandments written in stone.
So shall we start?

LESSON 1: On making your adventure attractive for players
Okay, let's begin with a topic that's almost entirely ignored by newbie creators, causing their adventures to go unnoticed for a long time: the preview images.
A preview image is like the cover of a book. You know the saying "don't judge a book by its cover"? Well, a lot of people do judge the adventures from the preview pics. You have to understand that for most people it takes a couple of minutes to download the assets and load a mission, and they don't want to waste that time unless they have a reason to believe the adventure is going to be cool.
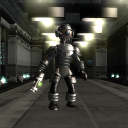
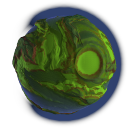
Which one would you rather play?
So you need at least four preview pictures to capture the player's interest. The first pic is the most important of all, since that's going to be the thumbnail of your adventure. A good thumbnail is the difference between getting on the Most Popular New shortlist and barely getting any plays. To take a screenshot you only need to click the "C" button once on your keyboard, and then sort out the four preview images you want for your adventure on the central panel where you also choose the name, genre, description and tags for your adventures.
Here are a few tips for getting good preview pictures:
- Don't leave the "default" planet picture on any of the preview slots, specially the first one. Unless you're making a planet template, that's pretty much the worse mistake you can make.
- Don't take your screenshots from the editor! You can enter the Test Drive Mode and take the shots from there. That way you won't end up with the handlers and team identifyers (those green, or red squares under each creature) showing up in the image. Those are visual aids for the editor, they're not part of your adventure!
- I know the Test Drive Mode has an important limitation on camera angles. But you can use the "freecam" cheat to allow you the freedom of choosing any camer angle you like. That's important, because you don't want the default captain creature to show up on the picture! Unless you're making a locked-captain adventure, the captain you choose on the editor is just a placeholder, and won't even show up in the adventure! So why should it be front and center on the preview?
- You can put together a scene specially for taking a picture. Remember you can delete the creations after taking a screenshot, so you're not constrained to taking pictures of events and places that actually happen or appear in the adventure. Try to create a scene that's descriptive of the whole adventure experience: put main characters in there, even if they don't appear together in the adventure; use effects to make the scene cooler and use gates to carefully place vehicles and creatures wherever you wish (check the How to disguise gameplay objects as creatures post if you need).
- Try to learn how the rectangle screenshot translates into a square preview pictures. You have to understand that the sides of the image will be cut off in the preview, and compensate for that. Take many screenshots from slightly different angles and positions, and choose the ones that look best. That way you'll learn by practising how to choose the best angles and layouts.
- Don't make locked-captain adventures. Unless you have a very good idea for a new game dynamic and you need control over the player stats, you have no reason to force the player to use a specific avatar. If the player can use his own captain, then he'll be awarded experience points for playing your adventure. That's an extra reason to get his/hers interest.
- Get your adventure to be worth more points! Sure, you can't control the value of your mission in experience points, but there are a few ways to make it a little bit higher. The main ones are: make your adventure harder (try to make the player die a couple of times before completing it); and make your adventure longer than a couple of minutes.
- Choose an interesting title. Good titles often sound cool, or have a good alliteration. Or they may be a reference to a famous work, a movie, a book, a play, a game, or even just a quote. And remember to capitalize your titles!
- Give the player a good idea what's the adventure about in the description, without spoiling the ending, of course! Look at the Maxis adventures for a model on good uncomplicated descriptions. Try to avoid breaking the fourth wall by adding "I made this adventure because I watched movie such-and-such" or "technical" info such as the adventure version. Leave those kind of comments to brackets, such as this: [adventure made from John Doe's template].
- Add good tags. Tags are important, but not essential. You can get a few extra plays if you're careful about choosing proper tags. Add stuff that the adventure has that may be of interest to players, such as: mystery, murder, explosion, love story, robots, zombies, etc.
9 comments:
Wish more people would read great advice like this! Thanks for posting it.
Sayonara.
how do you operate the Freecam cheat?
@Niall: open the cheat console (ctrl+shift+C) and type "freecam".
You got an epic blog there! those are great tips!
@Parkaboy: I'm not trying to be rude here, but the freecam cheat doesn't seem to work. I can't figure out how get the captain out of the shot. How do I do that?
@Niall: If you're on test drive mode, and you've alredy activated the freecam, then use the arrow keys or the mouse (click and drag, like you do in the editor mode).
Hey this is a great blog her! I started reading it a while ago and it has helped me tremendously in the outfitter! I do however think that you could add some tips on how to place buildings in a good way! The other thing you could do is tell people how to build an interior look! NOT in great detail but just tell them how the walls and floors and ceilings should be placed! This may seem obvious to some of the more experienced adventure creators but I have seen some really… well not great interior looks! (Gaps in the ceiling, Gaps in the floor, walls at odd angles, even walls above the ground so that you can see under them!!! Thank you for reading this and I understand if you don’t make a chapter on building placement!! P.S. If you want an example of some good building placement you should see “The Ravens House” it is by me “Thoarn”. Thanks! =)
Post a Comment